BACnet Integration enables DSS Pro to function as a client, allowing it to be recognized as a BACnet device or host when interfacing with third-party systems. This DSS Pro BACnet integration facilitates seamless communication by transmitting device status and events from DSS to other systems, such as Building Management Systems (BMS), via the BACnet protocol.
Moreover, with DSS V8.6, users can quickly configure BACnet integration on their client platform without additional development work. This guide explores the DSS Pro BACnet setup, configuration, and benefits of DSS V8.6 BACnet integration.
Before setting up BACnet integration, ensure the following:
DSS Professional V8.6 Installed: The BACnet Integration feature is available from DSS V8.6. Ensure that this version is installed and running.
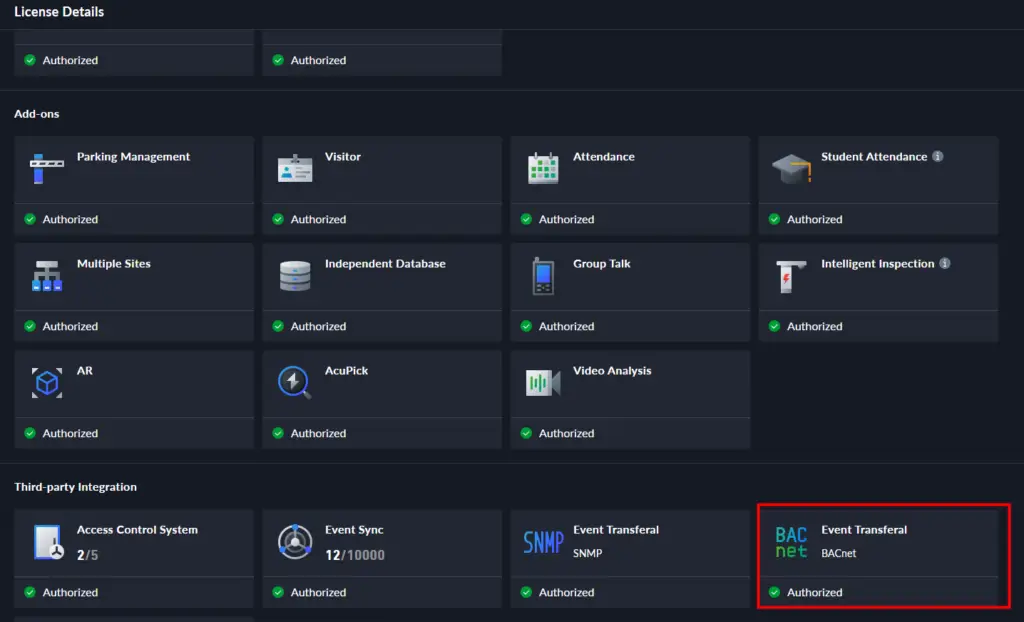
License Activation: Purchase and activate the Event Transferal-BACnet Module License. You can verify the activation status under [License Details] to confirm that the feature is authorized.

To enable secure communication between DSS and third-party systems:
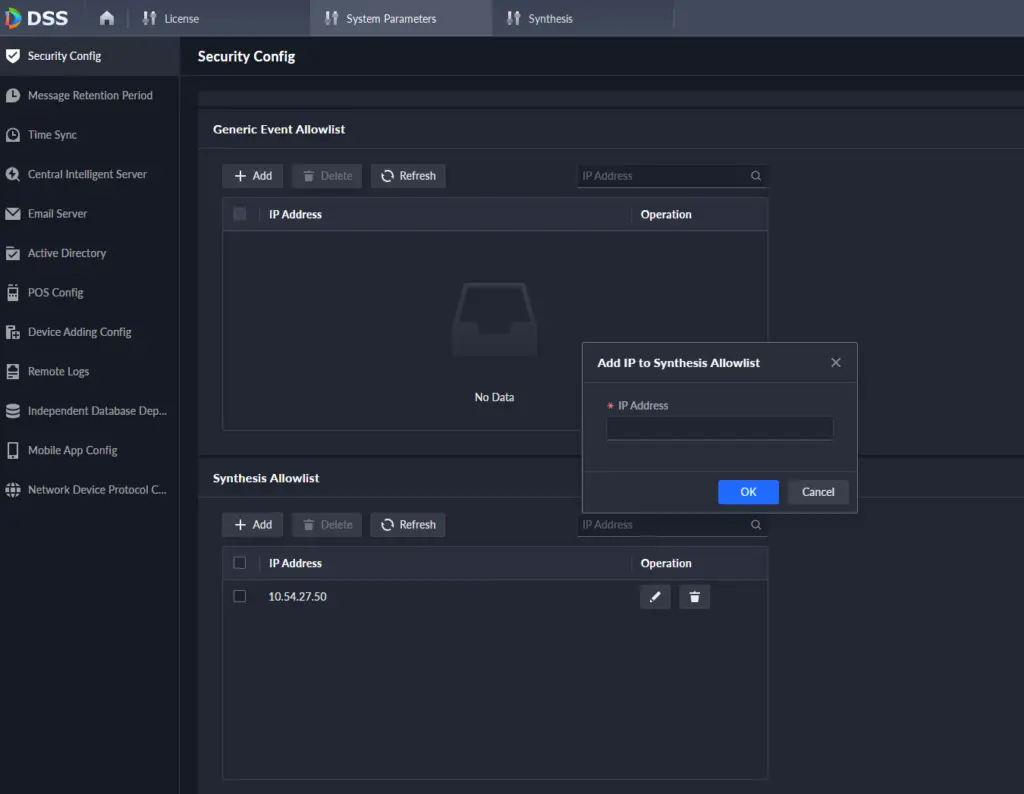
Navigate to [System Parameters] > [Security Config] > [Synthesis Allowlist].
Add the IP address of the third-party system to DSS before using BACnet integration.

By default, BACnet communicates over port 47808. If DSS and the third-party system are on different network segments:
Open DSS Management Tools.
Navigate to [Third-party Plugin Management Service].
Configure the BACnet UDP Port accordingly to ensure seamless connectivity.
Open the DSS Client and select [Synthesis].
Click [Event Transferal], then [Add] to create a new event transfer project.
Click [Add Project] and enter a project name and remarks.
In [Event Transferal Type], select [Trigger Out].
Under [Bridge Type], choose BACnet as the protocol type.
Enter the Device Name to identify DSS Pro in the third-party system.
Assign a unique Instance ID to distinguish DSS Pro from other devices.
Click [Save] to apply the settings.
On the Project Details page, select the BACnet project.
Click [Edit] to update the project as needed.
DSS Pro utilizes object templates to map device statuses and events to BACnet objects, ensuring efficient communication and integration. DSS Pro uses binary values to represent online/offline status and events:
0 – Offline
1 – Online
This structured approach ensures accurate monitoring and classification of device interactions.
Navigate to [Object Config], then click [Add].
Enter an Object Name and select the object template (Status/Event).
Choose the Resource Type (Device/Channel) to categorize event sources.
Click [Add] to select an event source from the resource tree.
Click [OK] to save the selection.
Additionally, DSS assigns Target Instance IDs to each device or channel, ensuring precise distinction.
Once completed, click [OK] to save configurations.
Objects appear in the Object Configuration List, where they can be edited or deleted.
Click [Export] to generate a detailed report of configured event sources and their unique instance IDs.
After configuring Event Transferal, finalize event settings in DSS:
Open DSS Config > App Config > [Event] Module.
Add an event template and select the same event resources used in the Event Transferal Project.
Click [Linked Action] and enable [Event Transferal].
Select the corresponding project to ensure event data is pushed correctly.
In summary, DSS V8.6 BACnet Integration streamlines interoperability between DSS Pro and third-party systems like BMS. By following this DSS Pro BACnet guide, you can seamlessly configure BACnet communication, enhancing system monitoring and security efficiency.
For more details, visit the official documentation or contact our support team.
📞 WhatsApp: +254712724949
📧 Email: hello@mwando.co.ke
Keep learning more from our BLOG

12 Comments
go88 bet.netMarch 4, 2025
Go88 bet net. Another site? Ok,ok! I think I’ve seen it around. Always on the hunt for new platforms. I would recommend it, go to go88 bet.net.
ae66March 4, 2025
ae66 is growing on me. The interface is clean, and it’s easy to find what you’re looking for. Big plus in my book. ae66
888betMarch 4, 2025
Hey, I’ve been trying out 888bet, and it’s pretty cool. Good site to browse and some decent games. Have a look at 888bet when you get a chance!
8iplgameloginMarch 4, 2025
Hey folks, just logged in to 8IPGameLogin. The login process was smooth and quick. Looking forward to trying out their games. Seemed easy to navigate. Worth a peek. Log in here: 8iplgamelogin.
qh99casinoMarch 4, 2025
Yo, just tried out QH99casino and it’s pretty legit. Slots are fire and the payouts are decent. Definitely worth checking out if you’re looking for a new place to spin some reels. Check it out at qh99casino.
tirangagameappMarch 4, 2025
Downloaded tirangagameapp, and it’s kinda fun. Not gonna lie. Worth a download if you’re looking for something new. Try it! tirangagameapp.
747liveemailaddressMarch 4, 2025
Spent ages digging for the official 747 Live email address! Turns out, 747liveemailaddress had it listed clearly. Huge time-saver! Hope it helps you guys too.
nn777slotjililogindownloadMarch 4, 2025
Looking to download NN777 Slot Jili? Watch out for fake links. I used nn777slotjililogindownload and got the real deal. Easy peasy download! Recommend checking it out.
phspinlifeloginMarch 4, 2025
PHSpinLifeLogin, giving it a go was surprisingly smooth. No hiccups during login and the experience was alright. Worth a shot if you’re looking for an easy login experience. phspinlifelogin
goo88hitMarch 4, 2025
Hit up goo88hit last night and had a pretty good time. Nothing mind-blowing, but solid entertainment. If you’re bored and looking for something to do, give it a try: goo88hit
566betcomMarch 4, 2025
Alright 566BetCom! This looks like a site with good potential. Hoping for some generous odds and a solid selection of games. Let’s place some bets: 566betcom
jljl44March 4, 2025
JLJL44… short, sweet, and to the point! Always a good sign. I am trying to play some games here! Join me!: jljl44